Colemak Typing
If you want to make your typing experience better, you are in the right place. Here, we will discuss why you should choose the Colemak layout, and we will also learn the touch typing method on a Colemak keyboard. This 30-day course will help you to improve your typing on a Colemak keyboard.
Why choose Colemak layout for typing?
The Colemak keyboard layout was designed by Shai Coleman in the year 2006 to improve typing speed and accuracy. Shai Coleman designed the keyboard in such a way that qwerty users can easily shift to it.
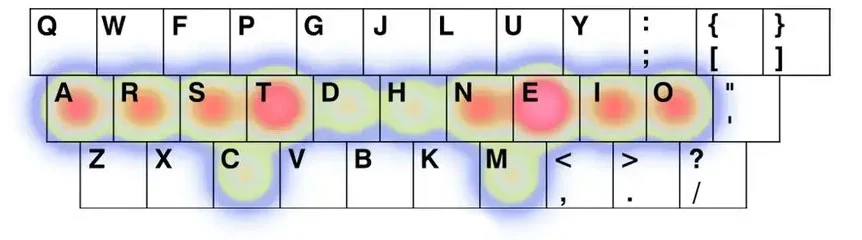
You can type 30 - 32 commonly used English words using the home row keys of a QWERTY keyboard. On the other side, using only the home row keys of a Colemak keyboard, you can type more than 340+ English words. That means no need to move your finger up and down to type these 340+ words. Also, if you see the heatmap of most typed letters on a keyboard, you will understand why the Colemak layout is better than the QWERTY layout.
We have already compared Colemak and QWERTY keyboards in this post, "Best keyboard layout for typing". If you want to know more, please visit.
- Colemak maintains the placement of many letters from QWERTY to ease transition for users. However, it is optimized to reduce finger movement.
- The keys are placed in such a manner that you do not need to jump your fingers frequently between rows, which improves typing speed and comfort.
- Without moving your fingers, using only the home row keys, you can type more than 340 words.
- Most typed keys are placed around the index and middle fingers so that these stronger fingers can work efficiently.
Learn Colemak Typing
To learn touch typing on a Colemak keyboard first you need to know the finger placement. Feel the bump over the T and N keys, and place your index fingers over these keys. Now place the middle fingers over S and E, the ring finger over R and I, and lastly, the small finger over A and O. This will be the home position of your fingers. You need to get your fingers back to this position after every keystroke.
You can see the figure for reference.

Here is the chart of keys and fingers that should be used to press the key.
Now once you understand the finger placement, it's time to practice. Use our 30-day Colemak typing training program to practice. Here we will learn step by step and improve finger moments as well as overall typing speed.